Git常用命令参考手册 基本涵盖了在开发中用到的git命令,能满足日常需求。
目录 配置 1 2 3 4 5 6 7 8 9 10 11 12 13 14 15 16 17 18 19 20 21 22 23 24 25 26 27 28 29 30 31 32 33 34 35 36 37 38 39 40 41 42 43 44 45 46 git config --global -l git config --local -l git config --list --show-origin git config --global --get user.name git config --global --get user.email git config --global user.name "username" git config --global user.email "[email protected] " git config --local user.name "username" git config --local user.email "[email protected] " git config --unset --global user.name git config --unset --global user.email git config --global core.editor nano git config --global merge.tool vimdiff git config -e git config core.fileMode false git config --global core.ignorecase false git config submodule.recurse true git config --global credential.helper store git config --global credential.helper cache
命令别名配置 1 2 3 4 5 6 7 8 9 10 11 12 13 git config --global alias.st status git config --global --replace-all alias.st status git config --global alias.st '!echo hello' ; git config --global alias.mg '!git checkout develop && git pull && git merge master && git checkout -' ; git config --global --unset alias.st
配置代理 1 2 3 4 5 6 7 8 9 10 11 git config --global https.proxy http://127.0.0.1:1087 git config --global http.proxy http://127.0.0.1:1087 git config --global --get http.proxy git config --global --get https.proxy git config --global --unset http.proxy git config --global --unset https.proxy
初始化仓库 git init 创建一个空的Git仓库或重新初始化一个现有的仓库
实际上 git init 命令用得不多,通常在GUI上进行操作。1 2 3 4 5 6 7 8 git init git init -q git init --bare
克隆仓库 1 2 3 4 5 6 7 8 9 10 11 12 13 14 15 16 17 18 19 20 21 22 23 24 25 26 27 28 git clone https://github.com/username/repo.git git clone [email protected] :username/repo.git git clone -b develop https://github.com/username/repo.git git clone -b develop --single-branch https://github.com/username/repo.git git clone https://github.com/username/repo.git git-study git clone --recursive https://github.com/username/repo.git git clone --depth=1 https://github.com/username/repo.git git clone --depth=1 --no-single-branch https://github.com/username/repo.git git clone --bare https://github.com/username/repo.git git clone --mirror https://github.com/username/repo.git
克隆指定文件夹 有些仓库会包含 客户端、服务端、等多个端的代码, 但又不想完整克隆整个项目, 只想克隆某个文件夹,这个时候就需要用到 稀疏检出。
开启稀疏检出必须满足2个条件:
core.sparsecheckout 设置为 true.git/info/sparse-checkout 文件列出要检出的目录列表1 2 3 4 5 6 7 8 9 10 11 12 13 14 15 16 17 18 mkdir hello-git && cd hello-gitgit init git remote add origin https://github.com/username/repo.git git config core.sparsecheckout true echo "media" >> .git/info/sparse-checkoutgit pull origin master
管理仓库 git remote 命令用来管理远程仓库。
通常一个项目对应多个仓库就需要用到 git remote, 比如要推送到 github / gitee / gitlab, 就可以用 git remote 来管理多个仓库地址。1 2 3 4 5 6 7 8 9 10 11 12 13 14 15 16 17 18 19 20 21 22 23 24 25 git remote git remote -v git remote add example https://github.com/username/repo.git git remote show example git remote rename oldName newName git remote remove example git remote set-url origin [email protected] :username/repo.git git push example
暂存文件 1 2 3 4 5 6 7 8 9 10 11 git add -A git add ./README.md git add . git add 1.txt 2.txt ...
提交文件 1 2 3 4 5 6 7 8 9 10 11 12 13 14 15 16 17 git commit -m "changes log" git commit README.md -m "message" git commit -v git commit --allow-empty-message git commit --amend -m "新的提交信息" git commit --no-verify -m "Example"
修改提交日期 执行 git commit 时 git 会采用当前默认时间,但有时候想修改提交日期可以使用 --date 参数。
格式:git commit --date="月 日 时间 年 +0800" -m "init"
例子:git commit --date="Mar 7 21:05:20 2021 +0800" -m "init"
月份简写如下:
月份简写 描述 Jan 一月 Feb 二月 Mar 三月 Apr 四月 May 五月 Jun 六月 Jul 七月 Aug 八月 Sep 九月 Oct 十月 Nov 十一月 Dec 十二月
推送远端 1 2 3 4 5 6 7 8 9 10 11 12 git push git push -u origin master git push origin <branchName>:<branchName> git push -f
查看分支 1 2 3 4 5 6 7 8 9 10 11 12 13 14 15 16 17 git branch -a git branch git branch -r git branch -vv git reflog show --date =iso master git branch -a | grep dev
切换分支一 另一种切换分支方法是使用 switch命令 1 2 3 4 5 6 7 8 9 10 11 git checkout master git checkout - git checkout -f master git checkout -t upstream/main
在克隆时使用 --depth=1 切换其他分支,比如切换 dev 分支:1 2 3 4 5 6 git clone --depth=1 https://github.com/username/repo.git git remote set-branches origin 'dev' git fetch --depth=1 origin dev git checkout dev
切换分支二 git switch 命令在git版本 2.23 引入, 用于切换分支。
git checkoutgit switch 意义在哪里? 因为 git checkoutgit switch。1 2 3 4 5 6 7 8 9 10 11 12 13 14 15 16 17 18 19 20 git switch develop git switch - git switch -f develop git switch -c newBranch git switch -C newBranch git switch -c newBranch HEAD〜3 git switch -t upstream/main
创建分支 1 2 3 4 5 6 7 8 9 10 11 12 13 14 15 16 17 18 git branch develop git branch -f develop git checkout -b develop git checkout -b develop git push origin develop git checkout --orphan develop git rm -rf . git add -A && git commit -m "提交" git push --set-upstream origin develop
删除分支 注意:删除分支不能删除当前分支,先切换到其他分支再删除。1 2 3 4 5 6 7 8 9 10 $ git branch -d <branchName> $ git branch -D <branchName> $ git push origin :<branchName> $ git push origin --delete <branch-name>
重命名分支 1 2 3 4 5 6 7 8 9 10 11 git branch -m <branchName> git push origin :old_branch git push -u origin new_branch git branch -m old_branch new_branch
转移提交 git cherry-pick 可以用来将一个分支的某次提交转移到当前分支中。
假设有 dev 和 main 2个分支, dev 分支中有10次提交记录, main 分支想把 dev 的第5次提交记录合并到当前分支中, 这正是此命令的使用场景。
还可以理解为将以前的某次提交再重新提交一次。1 2 3 4 5 6 7 8 9 10 11 12 13 14 15 16 17 18 git cherry-pick <commit_id>|branch_name git cherry-pick <commit_id1> <commit_id2> git cherry-pick -x <commit_id> git cherry-pick -e <commit_id> git cherry-pick --abort git cherry-pick --continue
临时保存 应用场景:假设当前分支某些功能做到一半了, 突然需要切换到其他分支修改Bug, 但是又不想提交(因为切换分支必须清理当前工作区,否则无法切换),这个时候 git stash 应用场景就来了。1 2 3 4 5 6 7 8 9 10 11 12 13 14 15 16 17 18 19 20 21 22 23 24 25 26 git stash git stash save "修改了#28 Bug" git stash -u git stash list git stash pop git stash pop stash@{1} git stash pop --index git stash apply git stash clear git stash drop stash@{0} git stash drop
文件状态 1 2 3 4 5 6 7 8 9 10 11 git status git status -s git status --ignore-submodules git status --ignored
日志 查看历史日志可以通过 git log / git shortlog / git reflog。
git log 命令是3个最强大的命令1 2 3 4 5 6 7 8 9 10 11 12 13 14 15 16 17 18 19 20 21 22 23 24 25 26 27 28 29 git log git log -2 git log -p -2 git log -i --grep="fix: #28" git log -S "alert(1)" git log --author=username git log README.md git log --merges git log --graph --oneline git log --reverse
git shortlog 以简短的形式输出日志, 通常用于统计贡献者代码量。1 2 3 4 5 6 7 8 9 10 11 git shortlog git shortlog -sn git shortlog -n git shortlog -e
git reflog 通常被引用为 安全网,当 git log 没有想要的信息时可以尝试用 git reflog。
当回滚某个版本时记录是不保存在 git log 中, 想要找到这条回滚版本信息时 git reflog 就用上了。
责怪 git blame 意思是责怪,你懂的。
git blame 用于查看某个文件的修改历史记录是哪个作者进行了改动。1 2 3 4 5 6 7 8 9 10 11 12 13 14 15 16 17 18 git blame README.md git blame -L 11,12 README.md git blame -L 11 README.md git blame -l README.md git blame -n README.md git blame -e README.md git blame -enl -L 11 README.md
合并 feature/v1.0.0 分支代码合并到 develop1 2 git checkout develop git merge feature/v1.0.0
将上一个分支代码合并到当前分支
以安静模式合并, 把develop分支合并到当前分支并不输出任何信息
合并不编辑信息, 跳过交互1 git merge develop --no-edit
合并分支后不进行提交1 git merge develop --no-commit
退出合并,恢复到合并之前的状态
合并某个分支指定文件或目录1 2 git checkout dev src/utils/http.js src/utils/load.js
合并部分文件或文件夹 假设有 dev 和 main 2个分支,可是 dev 分支改动比较大,只想合并某个文件夹到 main 分支上,可以这么做:1 2 3 4 5 6 7 8 9 10 git checkout main git checout dev -- src1/ src2/ git add -A git commit -m "Merge..." git push
需要注意的是这会直接覆盖现有文件,而不是本质上的合并。
删除文件 1 2 3 4 5 6 7 8 git rm 1.txt git rm -rf . git rm -r --cached .
还原 还原操作通过 git restore 命令。
git restore 是在 2.23 引入的, 是为了分离 git checkout / git reset 职责。1 2 3 4 5 6 7 git restore README.md git restore README.md README2.md git restore . git restore --staged README.md
拉取 git pull 拉取最新内容并合并。
拉取远程分支最新内容 默认情况下拉取当前分支
拉取指定分支 1 2 3 4 git pull origin master:master git pull origin master
拉取指定工作目录 移动-重命名 git mv 命令用来重命名文件或移动文件, 大部分开发者会选择手动进行移动文件, 手动和用 git mv 是有区别的。
手动和命令两者的区别(假设README.md重命名为README2.md):
手动:先删除 README.md, 然后创建 README2.md, 历史记录无法正常追踪 git mv: 实际上是更新索引,把文件进行重命名, 可以通过历史记录方便检索git mv 和 uninx mv 命令很像,如果你熟悉的话。
注意:新创建的文件不支持 git mv , 必须先提交。1 2 3 4 5 6 7 8 git mv 1.txt 2.txt git mv -f 1.txt 2.txt git mv temp temp2
比较文件内容差异 git diff 命令用于查看工作区文件内容与暂存区或远端之间的差异。
git diff 1 2 3 4 5 6 7 8 9 10 11 12 13 14 15 16 17 18 19 20 21 22 23 24 git diff git diff README.md git diff dce06bd git diff e3848eb dce06bd git diff develop master git diff develop master README.md README.md git diff --name-only --diff-filter=U git diff --name-only HEAD~ git diff --name-only HEAD~~
查看历史提交信息 可以通过 git show 命令查看历史提交信息。1 2 3 4 5 6 7 8 9 10 11 12 13 14 git show git show d68a1ef git show d68a1ef README.md git show README.md git show feature/dev
回滚版本 回滚版本有2种方法:
git reset - 回滚版本后之前的历史记录将不保存, 不保留痕迹, 基本上不存在冲突情况。git revert - 回滚版本后之前的历史记录还存在并多增加了一条 Revert 记录,很容易出现冲突。git reset 命令用法:1 2 3 4 5 6 7 8 9 10 11 12 13 14 git reset --hard HEAD^ git reset --hard HEAD^^ git reset --hard 'commit id' git pull git push -f
git revert 命令用法:1 2 3 4 5 6 7 8 9 10 11 12 13 14 git revert HEAD^ git revert 8efef3d37 git revert HEAD^ --no-edit git revert --abort git push -u origin main
撤销 1 2 3 4 5 6 7 8 9 10 11 12 13 14 15 git checkout -- . git checkout -- README.md git reset HEAD^ git reset HEAD ./README.md git reset <commit_id> git reset --hard <commit_id>
标签 1 2 3 4 5 6 7 8 9 10 11 12 13 14 15 16 17 18 19 20 21 22 23 24 25 26 27 28 29 30 31 32 33 34 35 36 git tag git ls-remote --tags origin git tag -l "v1.0.0*" git tag -a v1.1.0 -m "标签描述" git tag v1.1.0 git log git tag -a v1.1.0 <commit_id> git push origin v1.1.0 git push origin --tags git tag -d v1.1.0 git push origin --delete v1.1.0 git checkout v1.1.0 git show v1.1.0
变基 git rebase 命令有2个比较实用的功能:
将多个commit记录合并为一条 代替 git mrege 合并代码 1、将多个commit记录合并为一条 要注意保证当前工作区没内容再操作。
1、指定需要操作的记录,这时候会进入交互式命令1 2 3 4 5 git rebase -i <start> <end> git rebase -i HEAD~5 git rebase -i e88835de
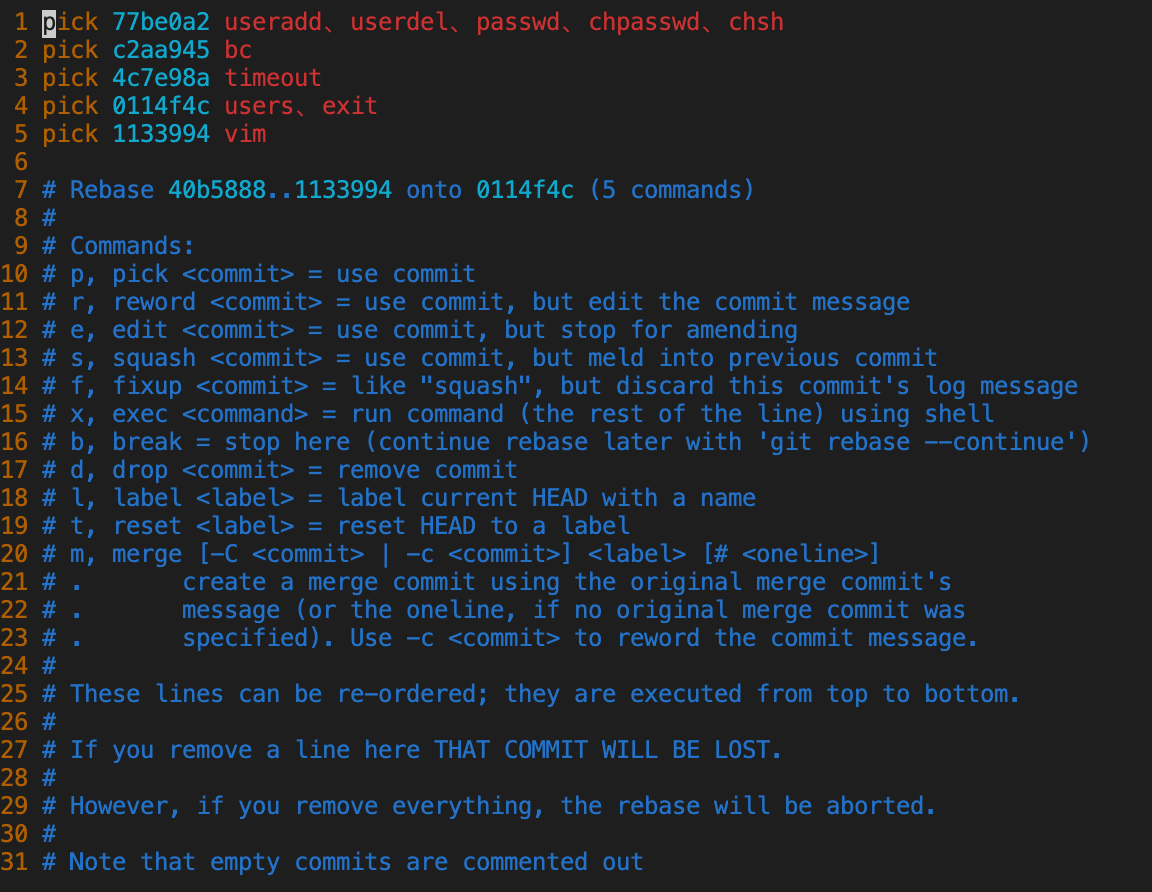
参数 描述 p, pick 保留当前commit,默认 r, reword 保留当前commit,但编辑提交消息 e, edit 保留当前commit,但停止修改 s, squash 保留当前commit,但融入上一次提交 b, break 在这里停止(稍后使用 git rebase --continue 继续重新设置基准) d, drop 删除当前commit
这里是倒序排列,最新的记录在最后
2、除了第一条后面全部改成 s 或 squash:
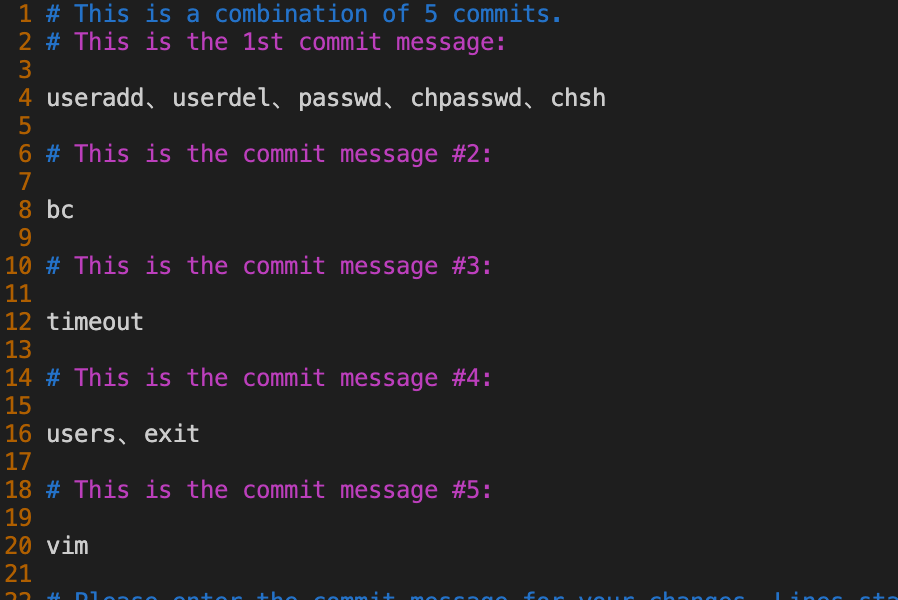
3、按 :wq 退出交互式,接着进入另一个交互式来编辑commit消息, 如果不需要修改之前的commit消息则直接退出:
4、强制推送到远端1 2 git push -u -f origin main
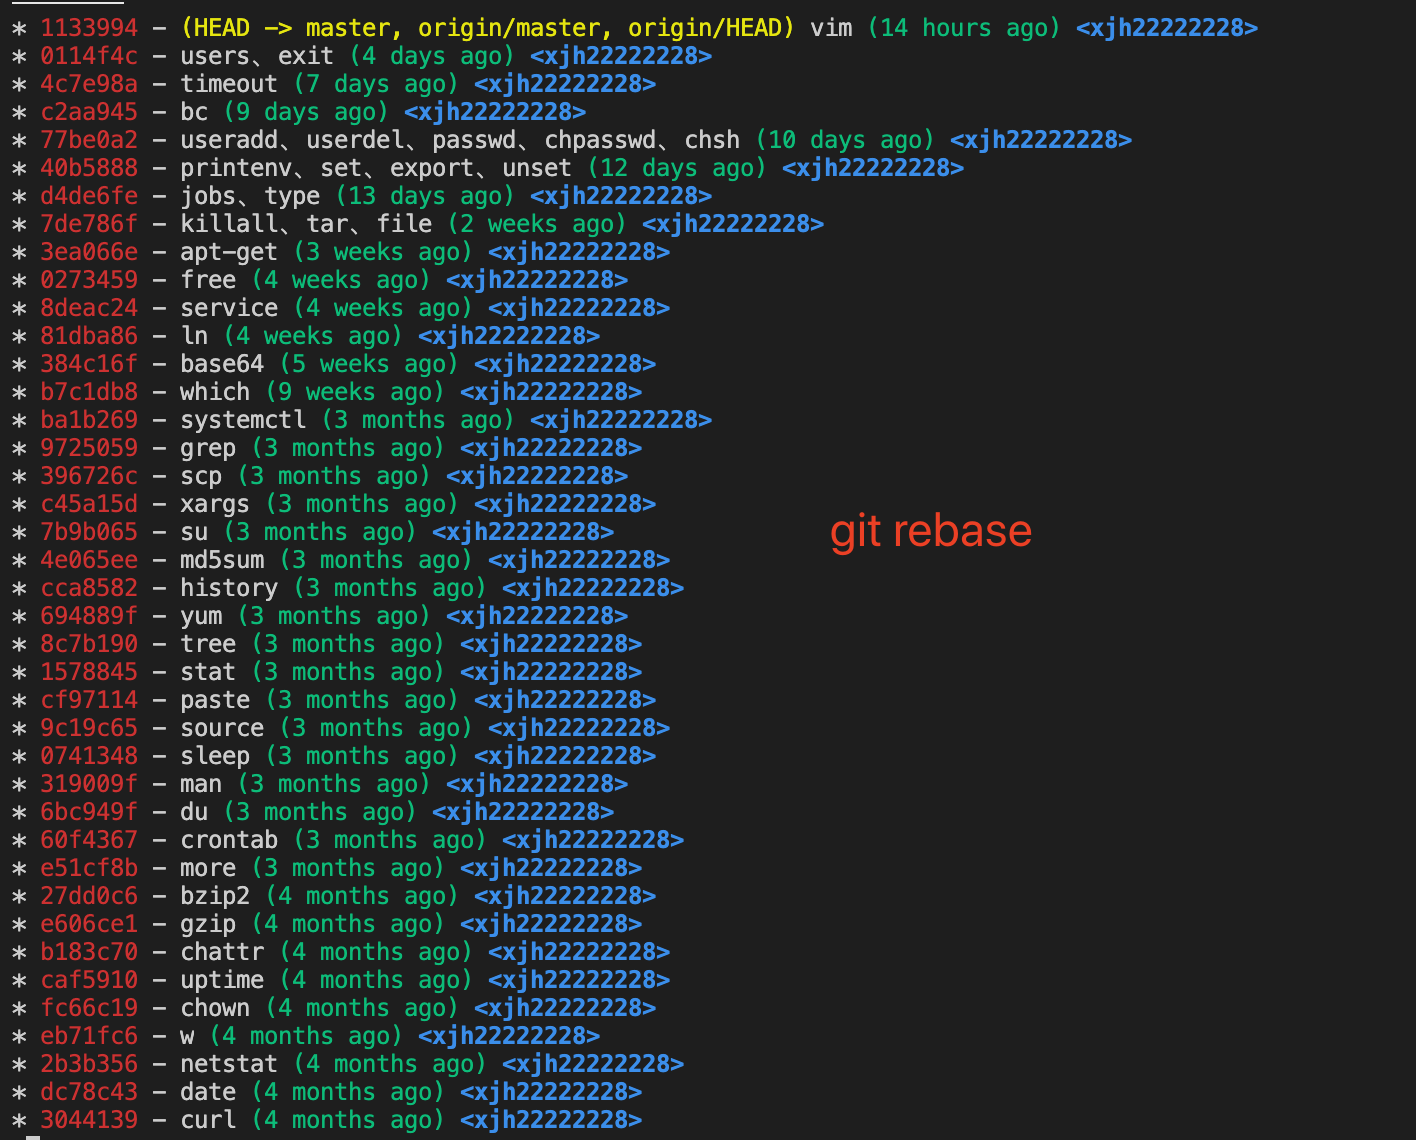
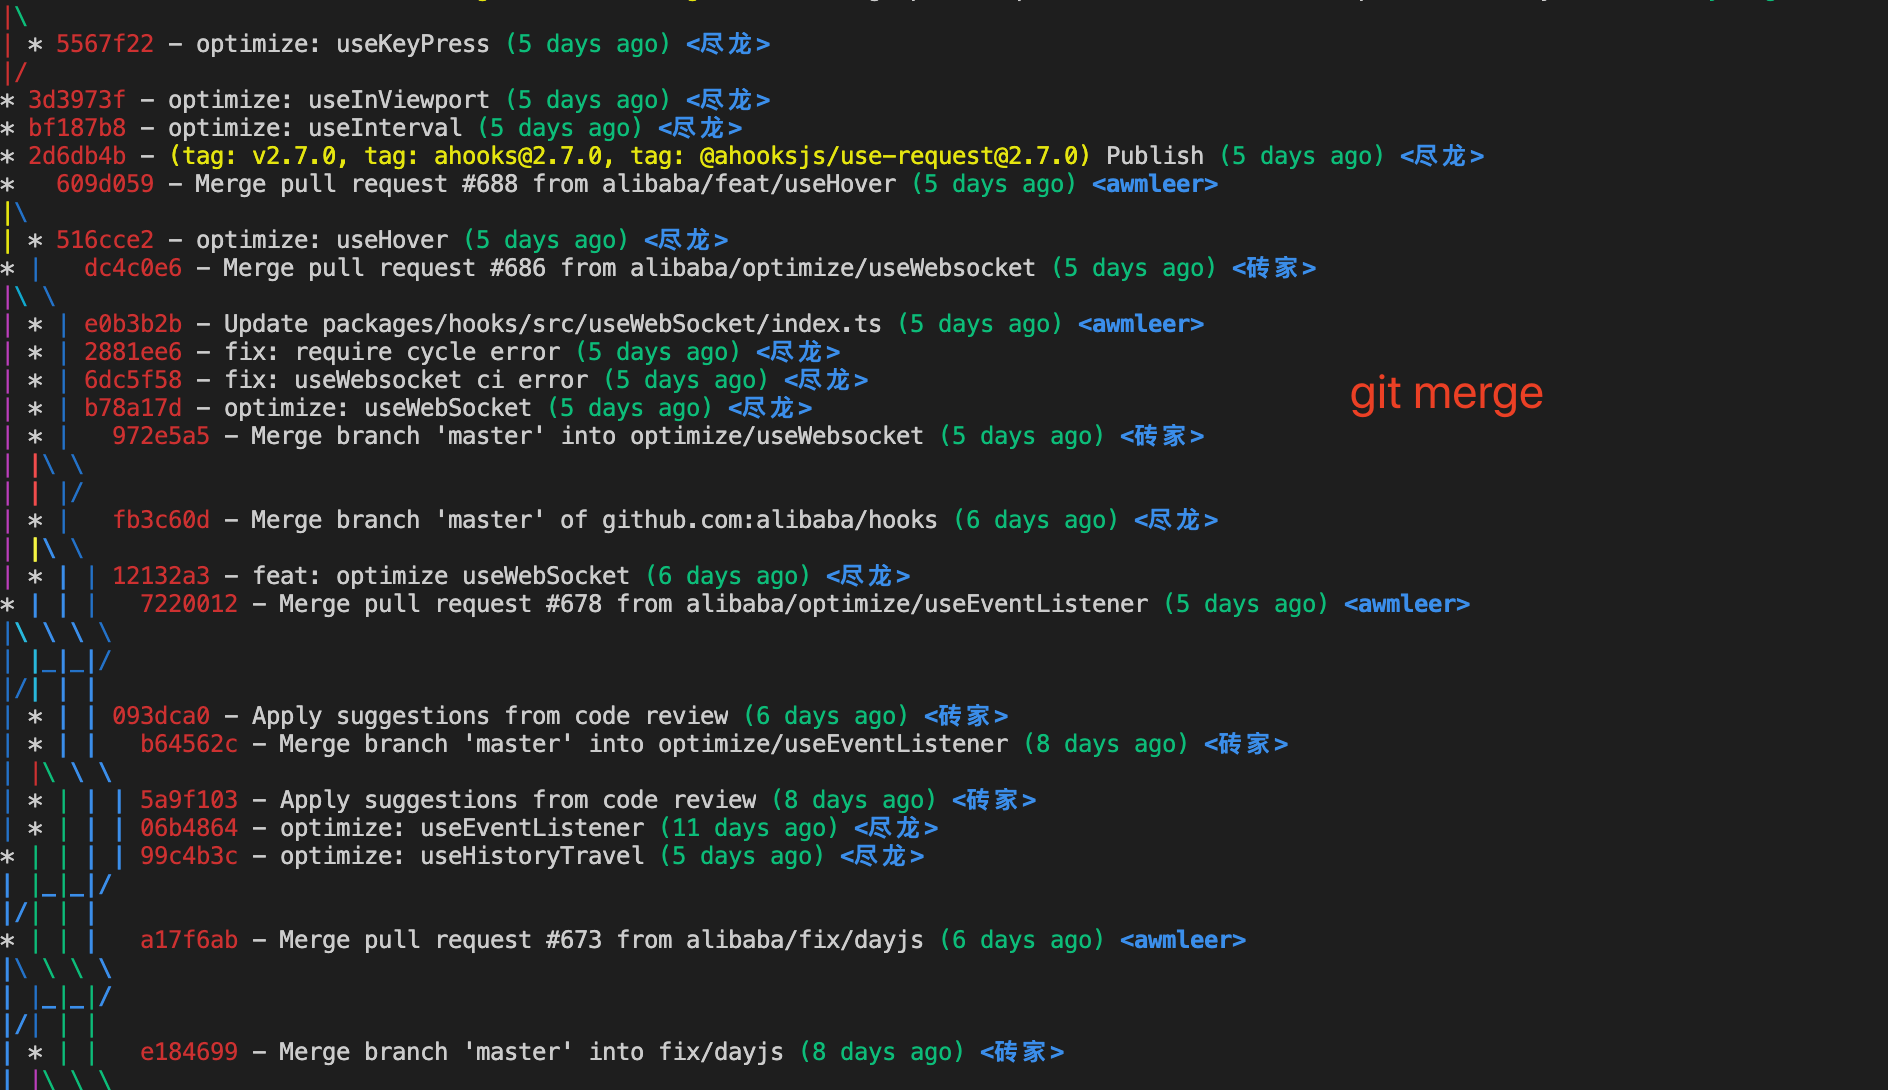
2、合并分支代码 都说用 git rebase 代替 git merge 进行合并,这2个区别在于 git rebase 可以使历史记录更清晰, 下面2张图对比一下:
第一张图是 git rebase,第二张图是 git merge。
可以看出 git rebase 是一条直线的,git merge 则是各种交叉,很难理解。
假设有2个分支,main 和 dev,下面使用 git rebase 将 dev 分支代码合并到 main 分支上。1 2 3 4 5 6 7 8 9 10 11 12 13 git switch main git rebase dev git push git add -A git rebase --continue git push -f
中断 git rebase 操作, 如果操作一半不想继续使用 rebase 命令则可以中断此次操作。
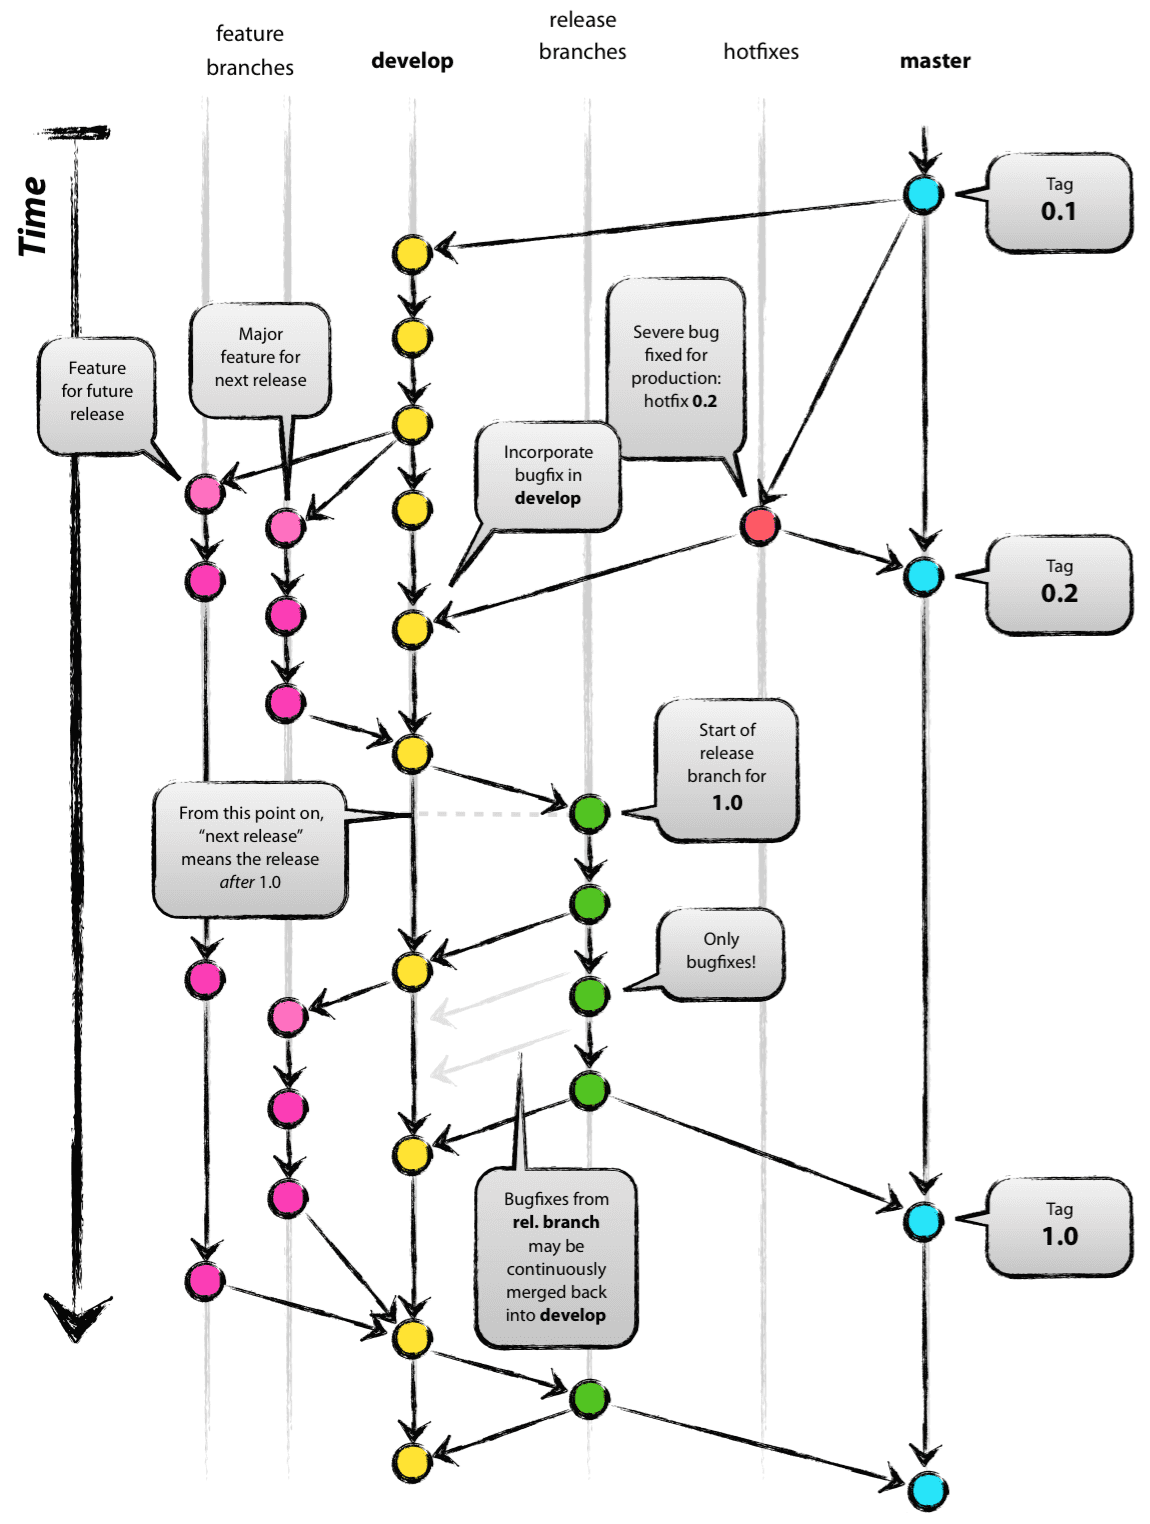
工作流 Git Flow 是一套基于git的工作流程,这个工作流程围绕着project的发布(release)定义了一个严格的如何建立分支的模型。
git flow 只是简化了操作命令,不用 git flow 也可以,只要遵循 git flow 流程操作即可,手动一条一条命令执行也一样的。
git flow 不是内置命令,需要单独安装。
初始化 每个仓库都必须初始化一次才能使用,这是针对当前用户而言的。
开始开发一个功能 假设我们要开始开发一个新的功能比如登录注册,这个时候就要打一个 feature 分支进行独立开发。1 2 3 4 5 6 7 8 git flow feature start v1.1.0 git flow feature publish v1.1.0 git flow feature finish v1.1.0
打补丁 什么情况下需要打补丁? 假设已经上线的功能有BUG需要修复就需要打补丁了。
hotfix 是针对 master 分支进行打补丁的。1 2 3 4 5 6 7 8 git flow hotfix start fix_doc git flow hotfix publish fix_doc git flow hotfix finish fix_doc
发布 假设产品给了个新需求并完成,这个时候可以选择发布。不发布也行,但是发布后会有版本区分,以后想找到某个版本的代码就很方便。1 2 3 4 5 6 7 8 git flow release start v1.1.0 git flow release publish v1.1.0 git flow release finish v1.1.0
Git flow schema
子模块 git submodule 子模块的作用类似于包管理,类似 npm, 主要是复用仓库, 但比包管理使用起来更方便。
子模块可以不建立版本分支管理代码, 因为它是依赖主应用,所以建立版本分支可以从主应用去操作,那么一旦建立新的版本分支当前的所有内容都会被锁定在这个分支上,不管子模块仓库怎么修改。
添加子模块 添加完子模块后会发现根目录下多了个 .gitmodules 元数据文件,主要是用于管理子模块。1 2 3 4 5 git submodule add https://github.com/username/repo.git git submodule add https://github.com/username/repo.git submodules/subrepo git submodule add -b develop https://github.com/username/repo.git
删除子模块 1 2 3 4 5 6 7 8 9 rm -rf submodulegit add -A git commit -m "删除子模块" git push
克隆一个包含子模块的仓库 1 2 3 4 5 git clone --recursive https://github.com/username/repo.git git submodule update --init --recursive
修复子模块分支 当把一个包含子模块的仓库克隆下来后会发现子模块分支不对,可以使用下面命令纠正:1 git submodule foreach -q --recursive 'git checkout $(git config -f $toplevel/.gitmodules submodule.$name.branch || echo master)'
更新子模块代码 方法一:通常我们需要更新代码只需要执行 git pull, 这是比较笨的办法。1 2 3 4 5 git pull cd git-manual && git pull
方法二:使用 git submodule update 更新子模块1 2 3 4 5 git submodule update --remote git submodule update --init --recursive
方法三:使用 git pull 更新, 这是一种新的更新模式,需要 >= 2.141 git pull --recurse-submodules
如果嫌麻烦每次 git pull 都需要手动添加 --recurse-submodules,可以配置 git pull 的默认行为, 如何配置请参考 配置
子树 如果你知道 git submodule 那就大概知道 git subtree 干嘛用了, 基本上是做同一件事,复用仓库或复用代码。
官方建议使用 git subtree 代替 git submodule。
git subtree 优势:
不会像子模块需要 .gitmodules 元数据文件管理 子仓库会当做普通目录, 其实是没有仓库概念的 支持较旧的Git版本(甚至比v1.5.2还要旧)。 简单工作流程的管理很容易。 git subtree 劣势:
命令过于复杂, 推送拉取都很麻烦 虽然用于替代子模块, 但使用率并没有子模块广泛 子仓库和主仓库混合在一起, 历史记录相当于有2个仓库的记录 git subtree 命令用法:1 2 3 4 5 6 git subtree add --prefix=<prefix> <commit> git subtree add --prefix=<prefix> <repository> <ref> git subtree pull --prefix=<prefix> <repository> <ref> git subtree push --prefix=<prefix> <repository> <ref> git subtree merge --prefix=<prefix> <commit> git subtree split --prefix=<prefix> [OPTIONS] [<commit>]
在操作 git subtree 时当前工作区必须清空,否则无法执行。
添加子仓库 --prefix 指定将子仓库存储位置main 是分支名称--squash 通常做法是不将子仓库整个历史记录存储在主仓库中,如果需要的话可以忽略整个参数添加子仓库后, 会跟普通文件一样看待,可以进入 sub/common 目录执行 git remote -v 会发现没有仓库。1 git subtree add --prefix=sub/common https://github.com/username/repo.git main --squash
更新子仓库 当远程子仓库有内容变更时,可以通过下面命令进行更新:1 git subtree pull --prefix=sub/common https://github.com/username/repo.git main --squash
推送到子仓库 假如修改了子仓库里的内容,可以将修改这部分的内容推送到子仓库中1 2 3 4 5 git add sub/common git commit -m "子仓库修改" git subtree push --prefix=sub/common https://github.com/username/repo.git main --squash
切割 随着项目的迭代, 主仓库会提交过多, 会发现每次 push 时会非常慢,尤其在 windows 平台较为明显。
每次 push 到子仓库里头时会花费大量的时间来重新计算子仓库的提交。并且因为每次 push 都是重新计算的,所以本地仓库和远端仓库的提交总是不一样的,这会导致 git 无法解决可能的冲突。
当使用 git split 命令后,使用 git subtree push,git 只会计算 split 后的新提交。1 git subtree split --prefix=sub/common --branch=main
二分查找 git bisect 基于二分查找算法, 用于定位引入Bug的commit,主要4个命令。
此命令非常实用, 如果你的Bug不知道是哪个 commit 引起的,可以尝试此方法。1 2 3 4 5 6 7 8 9 10 11 12 git bisect start [终点] [起点] git bisect start HEAD 4d83cf git bisect good git bisect bad git bisect reset
归档 创建一个归档文件,可以理解为将当前项目压缩为一个文件。会忽略掉 .git 目录。
但与 zip / tar 等压缩不同,git archive 支持将某个分支或commit进行归档。
参数
参数 描述 –format 可选,指定格式,默认 tar, 支持 tar 和 zip,如果不填会根据 –output后缀格式进行推断 –output 输出到指定目录
1 2 3 4 5 6 7 8 9 10 11 git archive --output "./output.tar.gz" master git archive --output "./output.tar.gz" d485a8ba9d2bcb5 git archive --output "./output.zip" master git archive --output "./output.zip" master src tests
格式化日志 在使用 git log 命令时可以携带 --pretty=format 用来格式化日志。
常用格式如下:
参数 描述 %H 完整 commit hash %h 简写commit hash 一般是前7位 %T 完整 hash 树 %t 简写 hash 树 %an 作者名称 %ae 作者邮箱 %ad 作者日期, RFC2822风格:Thu Jul 2 20:42:20 2020 +0800 %ar 作者日期, 相对时间:2 days ago %ai 作者日期, ISO 8601-like风格: 2020-07-02 20:42:20 +0800 %aI 作者日期, ISO 8601风格: 2020-07-02T20:42:20+08:00 %cn 提交者名称 %ce 提交者邮箱 %cd 提交者日期,RFC2822风格:Thu Jul 2 20:42:20 2020 +0800 %cr 提交者日期,相对时间:2 days ago %ci 提交者日期,ISO 8601-like风格: 2020-07-02 20:42:20 +0800 %cI 提交者日期,ISO 8601风格: 2020-07-02T20:42:20+08:00 %d 引用名称: (HEAD -> master, origin/master, origin/HEAD) %D 引用名称,不带 () 和 换行符: HEAD -> master, origin/master, origin/HEAD %e 编码方式 %B 原始提交内容 %C 自定义颜色
例子:1 2 3 4 5 6 7 8 git log -n 1 --pretty=format:"%an" git log -n 1 --pretty=format:"%ae" git log -n 1 --pretty=format:"%d" git log --pretty=format:"%Cgreen 作者:%an"
清空commit历史 清空 commit 有2种方法。
1、第一种方法原理是通过新建新的分支,假设要清空commit分支是 develop1 2 3 4 5 6 7 8 9 10 git checkout --orphan new_branch git add -A && git commit -m "First commit" git branch -D develop git branch -m develop git push -f origin develop
2、第二种方法通过更新 引用, 假设要重设 master 分支1 2 3 4 5 6 7 git update-ref refs/heads/master 9c3a31e68aa63641c7377f549edc01095a44c079 git add . git commit -m "第一个提交" git push -f
这2种方法都是用于清空 commit 历史, 不会造成当前文件的丢失,所以放心。
笔者推荐使用第二种方法,更安全可靠。
帮助 1 2 3 4 5 6 7 8 git help git help -a git help -c
提交规范 标志 描述 feat 该提交含有新的特性 style 通常是代码格式的修改 chore 构建过程或辅助工具的变动 fix 修复Bug docs 文档修改 test 单元测试改动 refactor 代码重构 perf 性能优化、体验 revert 回滚版本 merge 代码合并 typo 错字, 比如单词拼错
例子: 1 2 3 4 5 6 7 8 9 10 11 12 13 14 15 16 17 18 19 20 git commit -m "feat: 新增xx功能" git commit -m "style: 规范Eslint" git commit -m "chore: Update Jenkins" git commit -m "fix(登录闪烁): #688" git commit -m "docs: git pull" git commit -m "test: 测试登录" git commit -m "refactor: 流程模块重构"
解决冲突 代码合并/更新代码 经常会遇到冲突的情况。
解决冲突的流程如下: 执行 git pull 把代码拉下来,git 会自动尝试合并 编辑冲突文件, 根据实际情况保留本地代码还是远端代码 暂存文件并推送到远端 面向GUI的用户,推荐3个工具专门处理git冲突:
这篇文章专门介绍这2个工具如何使用
仓库迁移 仓库迁移也可以叫复制仓库。
有时候需要从一个旧仓库迁移到新仓库,如果手动只能把文件进行迁移,但是如果需要把分支、标签、历史记录一起迁移就需要复制仓库。
旧仓库A: https://github.com/username/A.git https://github.com/username/B.git
1、克隆旧裸仓库1 2 git clone --bare https://github.com/username/A.git
2、镜像推送至新仓库1 2 cd Agit push --mirror https://github.com/username/B.git
3、删除刚刚克隆的旧仓库
4、拉取新仓库1 git clone https://github.com/username/B.git
除了通过命令迁移之外,可以通过网页导入仓库的方式也可以。
技巧推荐 1 2 3 4 5 6 7 8 9 10 11 git config --global alias.lg "log --color --graph --pretty=format:'%Cred%h%Creset -%C(yellow)%d%Creset %s %Cgreen(%cr) %C(bold blue)<%an>%Creset' --abbrev-commit" git lg git config --global alias.lg "log --graph --pretty=format:'%Cred%h - %Cgreen[%an]%Creset -%C(yellow)%d%Creset %s %C(yellow)<%cr>%Creset' --abbrev-commit --date=relative" git config --global alias.his "log --graph --decorate --oneline --pretty=format:'%Creset %s %C(magenta)in %Cred%h %C(magenta)commited by %Cgreen%cn %C(magenta)on %C(yellow) %cd %C(magenta)from %Creset %C(yellow)%d' --abbrev-commit --date=format:'%Y-%m-%d %H:%M:%S'" git config --global alias.hist "log --graph --decorate --oneline --pretty=format:'%Cred%h - %C(bold white) %s %Creset %C(yellow)%d %C(cyan) <%cd> %Creset %Cgreen(%cn)' --abbrev-commit --date=format:'%Y-%m-%d %H:%M:%S'"
生成SSH Key 以下适用于 Mac / Linux。
1、进入到 ssh
2、替换为您的GitHub电子邮件地址
3、当提示“输入要在其中保存密钥的文件”时,按Enter。接受默认文件位置。 (建议修改名字,防止以后被覆盖)1 > Enter a file in which to save the key (/Users/you/.ssh/id_rsa): [Press enter]
4、在提示符下,键入一个安全密码, 默认回车即可1 2 > Enter passphrase (empty for no passphrase): [Type a passphrase] > Enter same passphrase again: [Type passphrase again]
5、生成的SSH Key 添加到 ssh config 中1 2 3 4 5 6 7 vim ~/.ssh/config Host * AddKeysToAgent yes UseKeychain yes IdentityFile ~/.ssh/id_rsa
最后将公钥添加到 https://github.com/settings/keys 中
其他 1 2 3 4 5 6 7 8 git --version git rm -r --cached . git ls-files
清除账号 清除git已保存的用户名和密码1 2 3 4 5 6 git credential-manager uninstall git config --global credential.helper "" git config --global --unset credential.helper
